Member Article - August 2008
The full version of this article is published in the August 2008 issue of METEORITE! magazine.
Hall of Meteorites
 Article by Anita Westlake |
Today I have over 128 different meteorites, with more coming in the mail every day. Originally, I kept my single meteorite in the tiny plastic bag it came in. I scrawled "Allende" on a scrap piece of paper and shoved it in the bag, calling it a day. As my fascination (and collection) grew, I used a small, lighted, one-shelf cabinet to display my rocks from space. Within a year the cabinet was too small. I moved them to shallow boxes with individual compartments. One box became two, then three. Finally, I started stacking the boxes on top of each other. That wasn't a very pretty or practical solution; I wanted to show off my treasures, not have people have to dig through boxes to see them.
Meanwhile, my friend, Dave Gheesling, presented me with a beautiful, framed Weston meteorite. The framed piece included engraved brass panels and photographs and was a work of art in itself. It measured over 2'x 3' and needed a very special place to be hung. The only walls left in my house that weren't already covered were in a narrow, dark hall. It hadn't been painted since I moved in 20 years before. A single, dim light bulb vainly attempted to light the whole hall but failed miserably. In order to do the Weston justice, I would have to re-paint the hall and install halogen track lighting. Thanks, Dave!
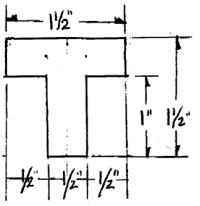 Figure 1: "T" Railing |
Ray came over and measured the space in my hall. I wanted a big enough area to hold all my meteorites in one display, and I told him I was going to use the smaller 3 1/4" x 4 1/4" Riker Mount boxes exclusively. Ray went home with the measurements and had his handy man cut a piece of plywood to cover the entire designated space. He took a 3 1/4" x 4 1/4" Riker Mount and used it as a guide to measure the height (plus a little) of the rows. He drew a line across the whole sheet of plywood, and continued to measure and draw lines across until the whole thing had horizontal lines all the way across and down the sheet (like a piece of ruled school paper). It is on these lines that wooden "T" shaped railings would be nailed and glued. (When Ray made this for his own house, he attached the railings directly to his wall and didn't use a sheet of plywood. You can do it either way). Next, Travis, the handy man, measured how deep the "T" railings needed to be to accommodate the thickness of the Riker Mounts. (See Fig. 1).
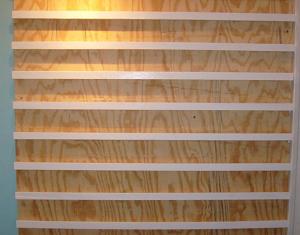 Figure 2: Complete painted wall display without meteorites 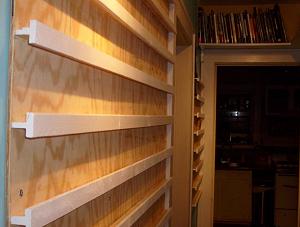 Figure 3: Another view of the empty wall display |
I painted the tops of the "T" railings a glossy white. There's no need to paint the plywood itself since it will be covered with Riker Mounts. Of course, you can paint the rail tops any color you like, even black to match the Riker Mounts. Figure 2 shows the complete, painted wall display without the meteorites.
The last part of the project was to get the meteorites in the Riker Mounts. I wanted a uniform look, so I created a specimen label on my computer. I cut them out so they would fit "just right" behind the glass in the Riker Mounts and hand-printed the information on each label. I tried typing in the information, but it was tedious and frustrating. Besides, the "hand-printed" look adds a personal touch.
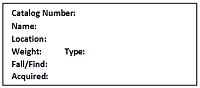
Figure 4: The specimen label
If I had the original label from the meteorite, I inserted it under the cotton batting in the Riker Mount. I hope when I'm dead and gone people will know to look for them there! (Labels can be as valuable as the meteorite itself).
If the meteorite weighed anywhere from 1-10 grams, I put it inside a tiny round or square plastic specimen box. I cut out the batting to the approximate size and shape of the plastic box, and then inserted the box into the hole in the batting. I kept the rest of the batting in place to secure the specimen label and keep the plastic box from shifting. Through trial and error I found that the square clear plastic boxes were just a little bit too thick for the Riker Mounts. I could close the Riker Mount box with its accompanying pins, but once I tried to slide it into the frame on the wall, it wouldn't slide. (When I tried to force it, the glass in the box shattered.) I had to undo the whole mess, take the square plastic box out, reposition the meteorite under just the lid of the plastic box, close up the Riker Mount and try to slide it in the frame again. This time it worked just fine.
If the meteorite was tiny, I put it in a tiny clear, plastic box with a magnifying lid. If it was over 10 grams and/or especially heavy, I cut out a rectangle of sticky shelf-liner and placed that on top of the cotton batting. I then placed the meteorite directly on the shelf-liner and once the Riker Mount was closed, it usually stayed in place. If the whole set up was still a little loose and the meteorite kept slipping down, I folded up some cardboard and stuck it behind the batting to make the fit tighter. You can get sticky, plastic shelf-liner from a "dollar store" in a few different colors. I chose white so it would blend in with the white of the cotton batting. See Figure 5 for the finished display.
 Figure 5: The finished display |
Unless you just put them up randomly, you're going to have to move some meteorites the next time you acquire one. There are only two solutions to this problem and I don't care for either one of them:
|
Anita Westlake was the president of the Meteorite Association of Georgia from 7/2007 through 7/2011.